Working in hosting or web development comes with many complex and repetitive tasks. First, you have to set up your server with your additional services and applications, such as e-mail, WordPress CMS, or antivirus tools – in most cases, using the console or a very user-unfriendly control panel. And, after that, you must remember all the updates you must perform manually!
Don’t worry – here with help comes Plesk! Plesk is a control panel that helps you manage your virtual or dedicated machine in just one control panel – from domain names, SSL certificates, and WordPress management to website backups, SEO, and eCommerce toolkits. Plesk was designed to make your work easier.
In this article, we explore the different uses and benefits of Plesk and guide you through the process of choosing, purchasing, and setting up your Plesk license.
What is Plesk?
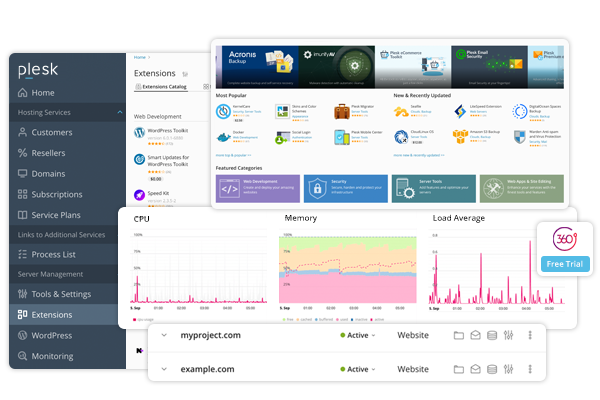
Plesk is a control panel for cloud and VPS hosting. A control panel is a web-based interface that simplifies the management of your hosting-related tasks. It’s an intermediary between system services and administrators, allowing you to get your work done without the need for complex command-line operations – from website deployment and DNS management to resource monitoring and security configurations.
As a control panel, Plesk helps you simplify and automate your daily operations while providing you with robust security, advanced collaboration tools, and an endless amount of extensions and customizations to tailor your Plesk experience to your specific needs. With the core needs of your business taken care of, Plesk lets you focus on your most important goals: growing your business and providing the best service to your customers.
Benefits of using Plesk
There are many benefits to choosing Plesk at Openprovider.
- Simplify your tasks. If you work in hosting or web development, chances are that you are working with a large multitude of servers, domains, and websites that fall under your management. This creates a large amount of complexity. Your workdays may be full of repetitive, yet error-prone tasks, such as domain and subdomain management, file and directory organization, and FTP account administration. With Plesk, these tasks are turned into streamlined or even fully automated processes. This means you have more time to focus on your core business – creating and maintaining beautiful and functional websites.
- Robust security. Cybercriminals do a lot of damage every year, both financially and to companies’ reputations. Defending your online assets should be a major priority for anyone in IT these days. With an integrated WebApp Firewall (ModSecurity) and Brute Force Protection (fail2ban), Plesk helps you protect your assets, keeping your websites and servers secure.
- Hundreds of extensions. Plesk makes it possible to customize your system with hundreds of extensions for tools and CMS systems that your customers may use, including the WordPress toolkit, SEO tools, security add-ons, and more. This means that you are never stuck with a package deal and that you have full freedom to tailor your Plesk experience to what your business and clients need.
- Competitive pricing. Openprovider is proud to offer the most competitive pricing for Plesk on the market. With us, you benefit from consistently low prices while taking advantage of everything that Plesk has to offer, including the full catalog of Plesk extensions. If you are an Openprovider Member, the prices even get better, with discounts increasing with every tier of the Membership Plan. For Members, prices for Plesk licenses at Openprovider start at just €6.02 per month!
How to choose and purchase a Plesk license?
There are three core Plesk licenses: Web Admin Edition, Web Pro Edition, and Web Host Edition. Each of them comes with different features. The most important decisive factor is the size of your domain portfolio. Web Admin Edition is the best choice for users with less than ten domains, while Web Pro Edition serves users with a portfolio of up to thirty domain names. Web Host Edition is the most advanced version, that can be used with unlimited domains. You can always upgrade to a higher plan if you need to!
Besides the number of included domains, Web Pro Edition and Web Host Edition also come with some other additional features that Web Admin Edition does not have. Go to the Plesk page and scroll down to see a full feature overview.
After choosing your plan, head to the control panel to purchase the Plesk license of your choice.
- Navigate to “Plesk Licenses” → “Order new Plesk license” in the left-hand menu.
- You will be presented with several options. Choose the first one “Plesk 12 / Onyx / Obsidian keys”.
- From the dropdown menu, you can select the type of Plesk license you want to purchase. Choose the Plesk license that suits the type of your machine: VPS or dedicated server.
- Enter the IP address of the server that the Plesk license will be connected to. It is against the PLESK EULA to use one license key on multiple machines. You can find more information about this here.
- Once you select your license, you can also add a title or comment to easily identify the Plesk license you purchased for a specific server. This is optional.
- Once you are all finished, click “Order Now”.
After the order is processed, you are presented with an order confirmation screen, including an activation code. This activation code is your license ID, through which you activate your Plesk license after installation.
How to install the Plesk License Key?
After purchasing your Plesk license and obtaining your Plesk license key, you need to install it on your server. Depending on the operating system you are using, please check the installation instructions for Linux or Windows. After the installation, you should activate your paid license using the key you received.
- Open Plesk, go to Tools & Settings → License Management (under “Plesk”), and click on “Install Key”.
- Enter the code you received in the email to the “Enter an activation code” field and click OK.
Once you activate the product, you can start using Plesk by setting up your Plesk control panel. There are plenty of usable articles available on the Plesk support pages. If you are new to using Plesk, we strongly recommend following the Quick Start Guide. After that, you can start by adding a new domain, installing a favorite CMS system, and securing your website with an SSL certificate.
Do you have any questions about getting started with Plesk? Take a look at our Knowledge Base, or contact our support team – they are always happy to assist you!
