

Do you want to enhance your email security and prevent third parties from sending emails in your name, while improving the deliverability of your legitimate emails? And do you want to avoid complicated technical work in the process? In that case, EasyDMARC is the way to go.
In this article, we give you a head start on how to get started with this hosted DMARC solution. We will show you the different types of email security protocols and how EasyDMARC can help you set them up. After this, we will discuss the order process, the EasyDMARC product setup, how to set up the DMARC record, and how EasyDMARC aggregate and failure reports work.
Types of email security protocols
There are four email security protocols that you should know: DKIM, SPF, DMARC, and BIMI.
SPF stands for “Sender Policy Framework”. SPF records define which servers and domains have your consent to send emails on your behalf.
DKIM stands for “DomainKeys Identified Mail”. This is an email authentication technique that relies on adding a digital signature (called a DKIM signature) to all outgoing emails. DKIM verifies to receiving servers that an email was indeed sent or authorized by the owner of the domain it originates from.
DMARC stands for “Domain-based Message Authentication, Reporting, and Conformance”. DMARC is built off the previously mentioned SPF and DKIM protocols and functions as an improvement and extension of these. It joins the mechanisms of SPF and DKIM together and streamlines the general email authentication process.
A large improvement of DMARC, compared to SPF and DKIM, is that this protocol shows automated aggregate and failure reports about all outbound emails to domain owners. This helps you keep track of all outgoing email flows and makes it easier to catch a potential abuse attempt.
BIMI records do not belong to the same “family” as DMARC, DKIM, and SPF – but they are still an important component of maximizing your email security. Adding a BIMI record to the DNS makes legitimate emails from your domain show a miniature company logo within receiving inboxes. These logos verify to your customers that your emails are genuine.
You can read more about these different records and what exactly they do in this detailed guide on DMARC, DKIM, SPF, and BIMI.
What is EasyDMARC?
EasyDMARC is a hosted DMARC solution that makes deploying DMARC, SPF, DKIM, and BIMI records seamless and easy. The tool provides an easy-to-use control panel that makes it easy to set up DMARC by yourself. The intuitive dashboard enables you to edit all settings, without any technical knowledge and without having to edit any record in the DNS yourself.
EasyDMARC also automatically provides you with useful data about outgoing email flows from your domain, including the servers that they come from. This data will give you valuable insights to further improve your email security and outgoing email strategies.
Benefits of EasyDMARC
EasyDMARC isn’t just a monitoring tool, it gives you much more! These are the biggest benefits of using EasyDMARC compared to using the manual approach.
- No technical knowledge needed. Using EasyDMARC, you do not have to edit anything in the DNS yourself. You can easily change and update each DNS record in a few simple clicks. This makes EasyDMARC accessible for everyone without needing advanced technical knowledge.
- Simplified reports. If you set up DMARC manually, you will automatically receive weekly aggregate reports by email. These reports show you all emails that you (or your team) sent from your domain this week, including all automated or transactional emails. However, these reports are notoriously difficult to read and understand for people with no technical background. EasyDMARC translates the reports into a dynamic, easily understandable dashboard, making it much easier to interpret the data.
- Extra integrated features. With EasyDMARC, you get access to a host of useful extra features, including a blacklist check tool, phishing check tool, tools for reputation monitoring, and more!
Do you want to learn more about how EasyDMARC can tangibly help you? Take a look at this case study of a happy EasyDMARC customer!
How can I purchase EasyDMARC for a domain?
EasyDMARC is easy to purchase for both new and existing domains. It is currently not possible to order EasyDMARC with us for a domain that is not in your Openprovider account.
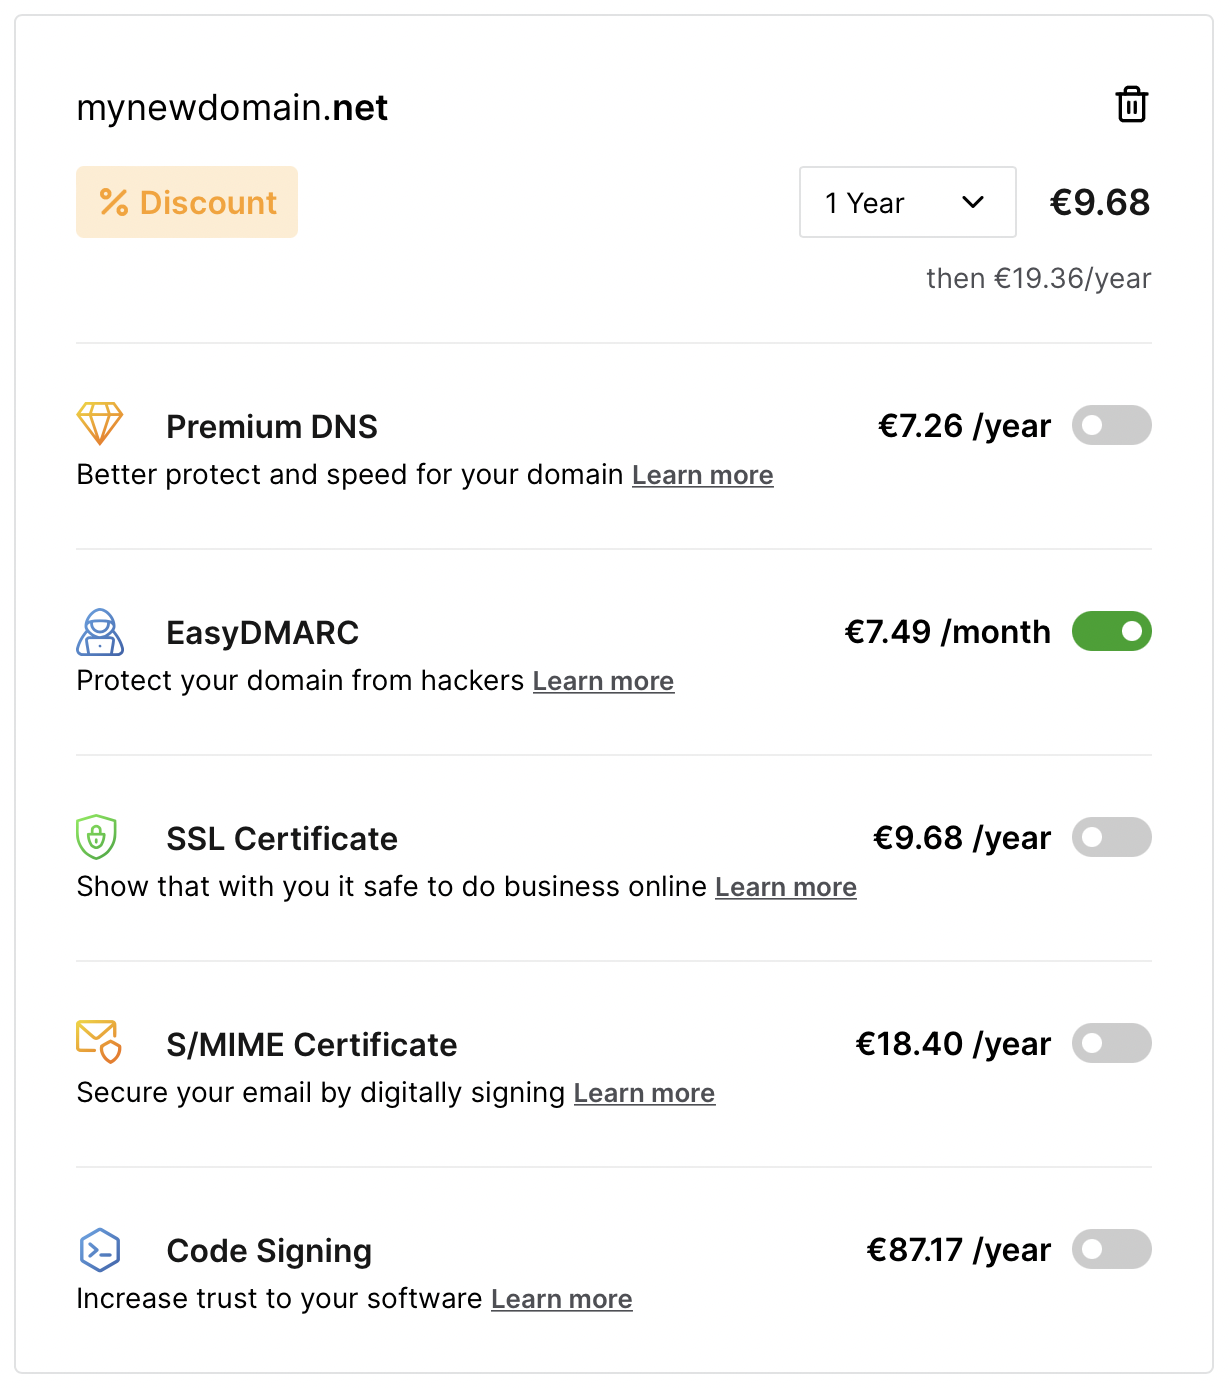
When you are purchasing a new domain, either through the website or the control panel, you will see a screen like the one below. Simply select EasyDMARC (and any other products that you want to purchase, such as an SSL certificate) and complete the transaction. EasyDMARC will immediately be added to your new domain.
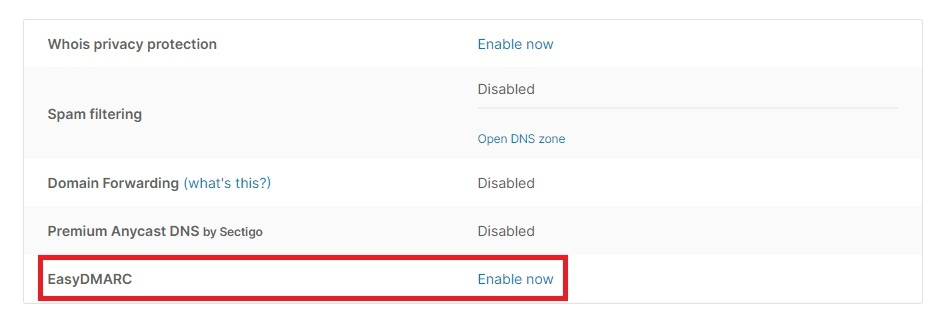
When you want to add EasyDMARC to a domain that you already registered, simply go to the control panel, find the domain on the domain overview page and click the “edit” button next to it. You will then see a page with an overview of all products and features you can enable for this domain. Click on “Enable now” next to EasyDMARC to enable EasyDMARC for this domain. Make sure to have enough available money in your account balance!
How can I activate EasyDMARC for my domain?
After you have purchased EasyDMARC for your domain, the DMARC record in the DNS needs to be activated before the tool starts protecting your email and generating reports. In case you buy EasyDMARC together with a new domain, or if you activate the product for an existing domain and decide to use our nameservers, you do not need to worry about this. Openprovider will automatically set up the DMARC record for you, while you can sit back and wait for the first data to come in.
In case you decide to not use our nameservers, you will need to manually set up the DMARC CNAME or TXT record in your domain’s DNS zone. Out of these two options, we strongly recommend adding a CNAME record. This option allows you to easily manage your settings from the EasyDMARC control panel. Adding a TXT record takes more manual work, but you may prefer adding a TXT record in some cases.
You can find detailed instructions on setting up the DMARC CNAME or TXT record in this helpful guide.
As soon as the CNAME or TXT record has been added to your domain’s DNS zone (either automatically or manually), EasyDMARC will start gathering data. You will be able to access the first data within 72 hours after you have finished setting up the tool. In general, it will take 4-6 weeks before the tool will have gathered enough relevant information for you to start tailoring it to your needs and basing decisions in your email strategy on the results.
What are DMARC policies and how do they work?
A DMARC policy allows you to indicate that your outgoing email messages are compliant with SPF and DKIM, and to tell receiving email clients what to do with unauthenticated emails that appear to come from your domain. You can set up DMARC with three different policies: monitoring (p=none), quarantine (p=quarantine), and reject (p=reject).
The monitoring policy is the entry-level DMARC policy. If you have this policy enabled, DMARC will simply monitor your sending sources without taking action regarding illegitimate emails. Unauthorized emails from your domain can therefore still end up in your contacts’ inboxes. However, you can analyze the data and find out who or what is sending these emails from your domain.
The quarantine policy is the next “step” on the ladder. This policy will automatically redirect unauthorized messages from your domain to the receivers’ spam boxes.
Finally, enabling the reject policy will tell receiving email clients to prevent all messages that come from unauthorized sources from being delivered. In this case, unauthorized messages from your domain will not even end up in spam boxes. They will simply never arrive in your contacts’ mailboxes.
When you are starting to use EasyDMARC, we recommend you start with the monitoring policy. Many beginners jump straight to the reject policy. Of course, no one wants any spam that comes from their domain to end up in their customers’ mailboxes. However, in most cases, this policy will also reject legitimate and important emails from your side, as you have likely not configured your email well when you are just starting out. We, therefore, recommend starting with the monitoring and quarantine policies and slowly working your way up to reject, while carefully analyzing the data that you receive through EasyDMARC’s dashboard.
How do EasyDMARC’s aggregate and failure reports work?
When you publish a DMARC record in your DNS (using EasyDMARC or not), every email service provider that supports DMARC (such as Yahoo and Google) will automatically send out reports containing critical information about your emails. These reports contain valuable information about your outgoing emails, such as information about the servers they come from and whether they were authenticated by you or not. All reports are sent in the form of compressed flat XML text.
EasyDMARC takes all of these reports and turns them into one aggregate, easily readable, and clickable data set. These reports will tell you more about the number of emails sent, the servers they come from, and your DMARC policy and alignment settings and how you can improve them.
Aggregate reports are updated once a day by default. If you wish to, you can adjust the interval to your preferences in the EasyDMARC control panel.
Besides these aggregate reports, you can also enable the option to receive failure reports from EasyDMARC. These reports contain edited copies of emails that failed authentication checks by email service providers. You can use failure reports to find out more about why these emails were rejected, and how you can prevent this from happening in the future. However, for beginning EasyDMARC users, we recommend starting with just monitoring and acting upon aggregate reports.
On top of that, DMARC failure reports are not supported by major internet providers due to privacy reasons, while aggregate reports are. Due to these restrictions, you may end up not receiving many failure reports either way.
How is EasyDMARC billed?
EasyDMARC is billed monthly. Prices are €6.49/month for Openprovider Members and €7.49/month for non-Members. Billing is done automatically, as long as you have a sufficient account balance.
